Thrips of New Zealand
Slide preparation for taxonomic research
The objective is to prepare specimens onto slides with their shape and color retained in a condition as close as possible to the natural, living state but with the body cleared so that surface detail is visible. This ideal is difficult to achieve, and a compromise must be adopted. There are two stages:
- Maceration to remove body contents
- Dehydration and mounting onto slides
Most specimens should be macerated to reveal fine details of body sculpture and minute setae. A few specimens should be prepared for study without maceration in order to preserve their natural color.
Tools
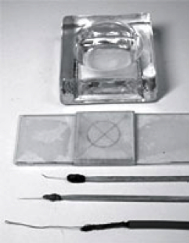
Specimens can be manipulated with fine micro-pins, mounted in sealing wax on match sticks. Use a pair of such pins, one straight but the other with the apex bent. A simple lifting tool to move specimens from one dish to another can be made from a small loop of fine wire. Alternatively, alcohols can be changed in dishes using a fine glass pipette. The most appropriate dishes to use are 'excavated blocks'—glass blocks 15mm high and 40mm square with a median excavation of about 5ml volume, and with a glass lid to prevent evaporation.
tools
Before trying to slide mount a specimen a mounting block should be prepared. Fix to the center of a microscope slide a 2mm deep layer of 1 inch square white card. Mark the center of this with crossed lines, and then cover it securely with plastic tape to provide a clean, shiny surface on which a cover slip can be placed when preparing a slide.