How to use
These interactive keys were designed using Lucid3 identification and key software and differ from most dichotomous keys. The keys provide the user with multiple identification features that can be selected at any time and in any order. It is highly recommended that you familiarize yourself with aspects of the specimen(s) you are attempting to identify as well as the tutorial below.
CAUTIONS:
- Please note that consideration should be given to the fact that larval fish meristics and size at a particular stage of development will vary from region to region and depend on temperatures during development.
- Different families, species, and life stages have varying amounts and levels of information available based on the resources used to develop the key. Thus, information for a feature (e.g., egg diameter) may not be available for every possible species. This may cause a species that in reality would fit a trait to be discarded when that trait is selected.
- Egg and yolk sac larvae have not been studied as extensively as larvae, which means that information for these development stages are more limited in features.
- When using geographic range or habitat to identify a species, know that specimens may drift far outside their normal range. This is especially true for the Atlantic and Pacific regions.
Getting Started: Before You Key
Before using this key, first examine the specimen and record as many of the following characteristics as possible (see Glossary for definition of terms). Measurements should be made in millimeters to the nearest 0.1mm.
Note that while you can choose features in any order, the keys are set up so that the most useful features are displayed at the top of the key. Each life stage also includes a section entitled "Additional Features to Aid in Identification". Use this section to find features that might not be available for most species.
You will more readily eliminate (or identify) specimens if you focus on determining the features below.
EGG:
- diameter of the egg in millimeters (mm)
- general shape of the egg (round or oval)
- presence of oil globule(s)
- presence of spines, filaments, or an attachment disc on the surface of the egg
- if the embryo inside the egg is developed, try identifying based on larval characteristics
LARVAE:
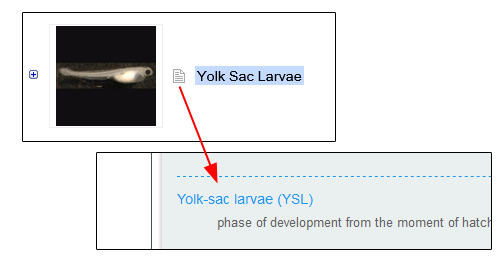
- is there a yolk sac present (if so, use the yolk-sac larvae portion of the key)
- body shape (eel-shaped, elongate but not eel-shaped, not elongate, laterally compressed)
- number of myomeres
- gut shape (straight, compact, looped, s-shaped, etc.)
- vent position (anterior, mid-body, posterior)
- number of gill openings (1 or multiple)
- total length of the specimen in mm
- head characteristics (head spines, chin barbels, adhesive disc, snout length - long or short as compared to total length)
- pigmentation characteristics
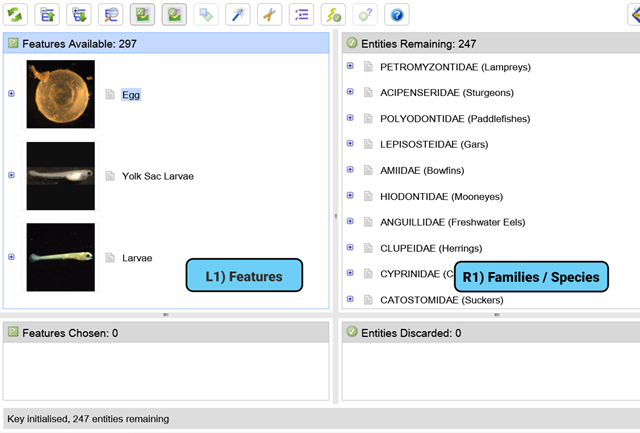
Main Display
The key is displayed as a grid, divided into four panes or quadrants. The top left (L1) quadrant is used to select features separated by Egg, Yolk Sac Larvae, or Larvae. The top right (R1) lists the fish families and species. The bottom two quadrants are used to show features you have selected and any families discarded during the selection process. If you see a + (plus sign), you can select the + to expand the list, selecting a - (minus) sign will close the list.
How to Key and a Simple Tutorial:
(See also: Menu Options for more detail on what you can do with the Lucid product.) All examples are shown using the Freshwater Key; however, the techniques and steps are the same for all the keys.
1. Select the + (plus) sign next to the Feature Category that fits the specimen you have (Egg, Yolk Sac, or Larvae).
For this example, I have selected "Larvae". Notice the list of other options expanded below it (body shape, myomeres, etc).
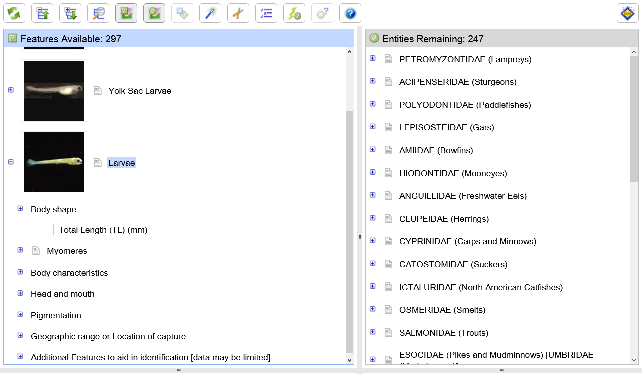
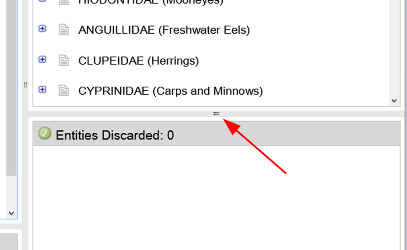
HINT: Note that each of the quadrants has a small slider bar (looks like an = sign). Select this and drag to change the size of the quadrant to give you more or less visibility.
2. Choose a feature that fits the criteria you have either measured or observed.
For the example, I have measured a Total Length (TL) of 25mm. For numeric features, when you click in the white data entry box, a pop-up box will appear where you input the number/value (e.g. 25 or 25.0). You may also enter a range, separated by a hyphen (e.g., 20-30).
Click "Enter".
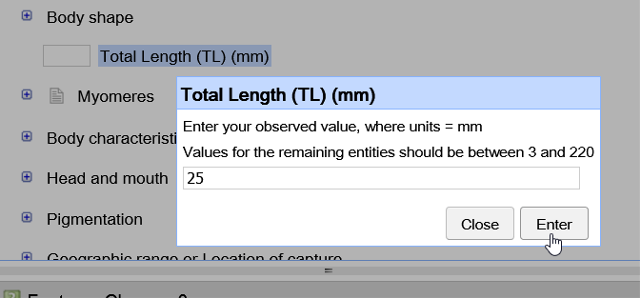
(NOTE: If you do not get a pop-up, be sure that you do not have pop-ups disabled in your browser settings.)
You will now notice changes in the other three panels.
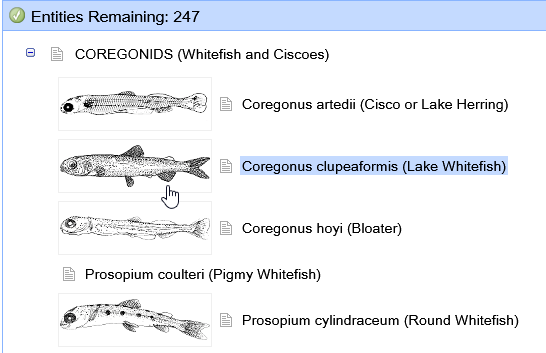
a) The top right panel now has a narrower list of Families and Species (Entities Remaining), changing from 247 to 55.

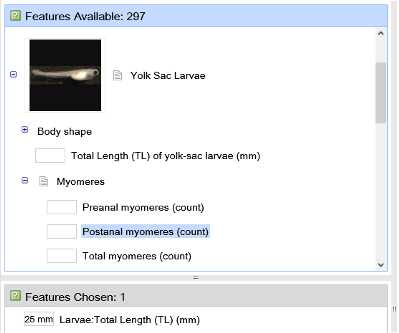
b) The bottom left panel above (Features Chosen) shows you what feature(s) you selected (searched for) - in this case, larvae total length; and the bottom right shows you which families/species you've eliminated (discarded) by your search.
c) The bottom right (Entities Discarded) shows you what families and species did not fit your search criteria.
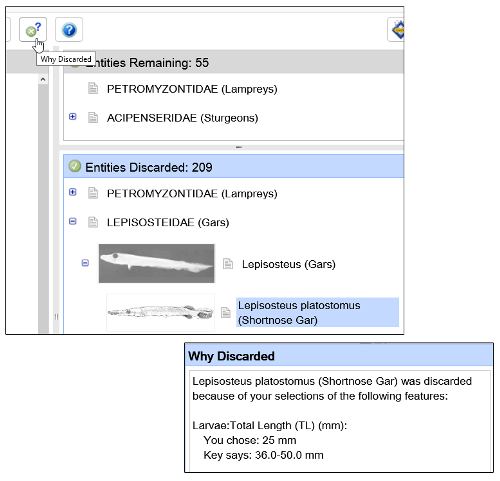
HINT: Curious why a species was eliminated? See the Menu Options for "why discarded" below.
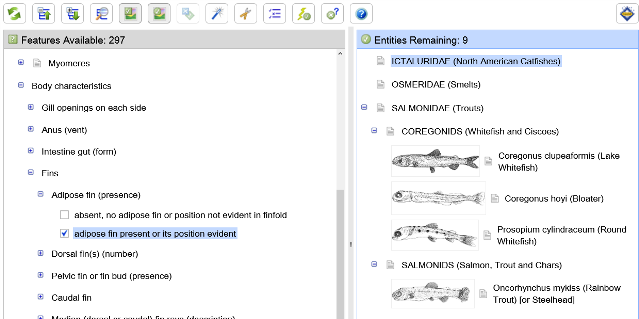
3. Continue adding features until you've identified your specimen. In this example, I have expanded Fins, Adipose fin presence, and then checked the box for Adipose fin being present.
This now takes my number of entities down to 9 entities (3 families and 4 species).
Why isn't the entity count seven? The entity list includes the count for families and species as well as any genus level categories, so with the additional two genera there are nine total entities. Also note that if the chosen feature is not identified for a species but could narrow down to just the family level, you will just see the family listing with no expansion + or species listed under it.
HINT: You can clear your entire search by hitting the restart key ![]() . Just remember this clears all the data back to the beginning. To clear just one item, unselect that check box or clear that numeric value.
. Just remember this clears all the data back to the beginning. To clear just one item, unselect that check box or clear that numeric value.
More: Menu Options
At the top of the key are menu options to assist you in navigating through the key.

1) Restart Key - resets the key, removing all features you have selected or entered.
2) Collapse List (collapse tree) - minimizes the list of features (so you will see + signs to expand a category) or fish species back to just family level. Note that you need to have selected the quadrant you wish to collapse (Click in the title heading for the quadrant and it will change from gray to blue when selected).
3) Expand List (expand tree) - expands the list of features or families. As above, you need to have selected the quadrant you wish to expand.
4) Search - allows you to search for features or entities. You can also invoke a search on most browsers by performing a ctrl + f.
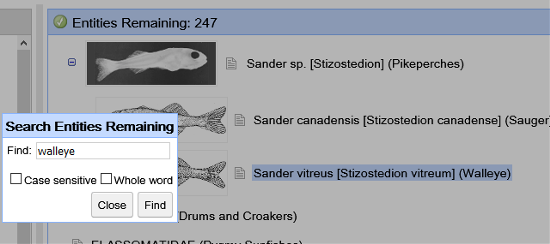
- As with most of these tools, you need to have the quadrant selected that you wish to search in. In other words, if you are searching for 'alewife', you need to have the entities (top right) quadrant selected - click in that bar and it will be highlighted in blue. If you are searching for a feature like myomeres, you need to have the top left quadrant selected.
- Generally, searches will be for the alpha characters you search for, even partial words (e.g., a search for 'ale' will also pull up 'alewife'). You may check the "Whole Word" box to only search for a word or phrase to be more precise.
- Searches also are case insensitive, meaning you don't need to worry about capitalization. If you do want to be more precise you can check the "Case Sensitive" box to have the search be case sensitive (e.g., only search for 'Alewife' but not 'alewife'). In most cases, this is not recommended.
- HINT: Due to the issue mentioned below, you are more likely to have a successful search if you first Expand the list (expand the entire quadrant) before doing your search.
NOTE: There is a known issue where the code behind a search might not work the first time. If it doesn't say "no matches found" but also does not show your searched for item, re-do the search. If it does say "no matches found", and you are sure it should have been successful - make sure you have the quadrant selected (highlighted), your term is spelled correctly, you don't have case turned on or exact phrase checked.
5) Turn feature thumbnails (images) on or off - if you do not wish to see feature images, you may turn them off.
6) Turn entity thumbnails (images) on or off - if you do not wish to see species or family images, you may turn them off.
7) Subsets - these keys do not use subsets at this time, so this feature will be grayed out.
8) Best Features - will determine the best feature to address next. The program will jump to and highlight that feature in Features Available.
NOTE: It is important to realize that what the system determines is best is based on features that have a high amount of scores and has no way to differentiate between egg, ysl, larva categories. So in the example below, even though I originally looked for Larva TL, the feature it thinks is next best is 'YSL postanal myomeres'. If you keep hitting the magic wand icon until you are no longer in YSL features, you will get to larvae best which is also postanal myomeres.
9) Prune Redundants - will scan the features in Features Available and remove any redundant features and/or states for the remaining entities. This may be useful to “clean up” the list of features, to make it less likely that a choice will be useless and to remove items that might be confusing. Generally this tool is only useful if you have selected a large number of features and still have a large number of entities you are trying to narrow down to.
10) Compare Differences - view a list of features that differ between the entities. Select this button and the system will then show you a list of all the species and what the values are for each feature. At the top of the pop-up box will be a dropdown that allows you to scroll through and select from all the various choices. Once you've made your choice, you will get another pop-up that will show you the values. If that feature has not been scored, you will see a ? for 'unknown'.

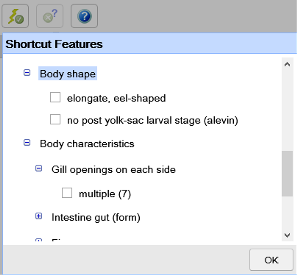
11) Shortcuts - Similar to the 'Best' button, this option enables you to be given those features which most likely will assist you in identifying your species without having to navigate the entire features list. As with best, remember that the system bases this on features that might help you identify species but might not include features that you have identified for your specimen.
12) Why Discarded - After choosing several states, entities which do not match the current selection are moved to the Entities Discarded window. To determine why an entity was discarded, select it from the Entities Discarded window then select Why Discarded from the top menu bar.
13) Help - will take you to the Lucid help page
More: Images
If you expand the list of Family names (either by single clicking on a + (plus) or by clicking in the top right panel and then choosing "Expand Tree" from the top menu bar, you will see images, where available, for the species'.
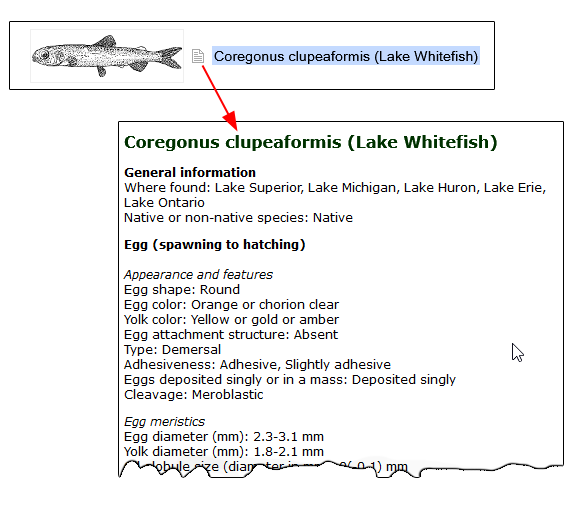
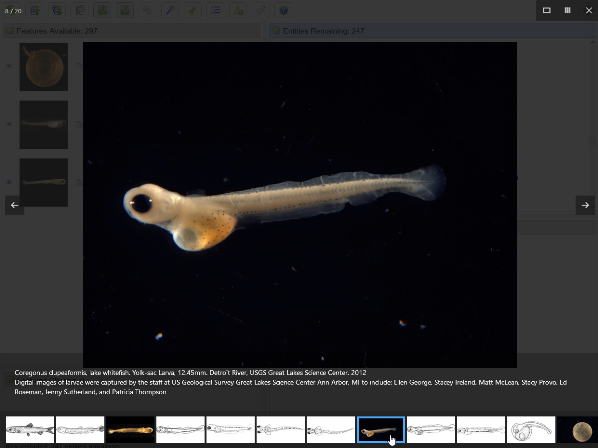
Clicking on a single small thumbnail image will bring up the Photo Gallery for that Species.
In this example, I clicked on the thumbnail image for Lake Whitefish. The Image Gallery will show the first image enlarged with additional thumbnails (if available) along the bottom of the gallery. Clicking on the one of the smaller images in the gallery pops up a larger view of the image. Hovering over the larger image will bring up metadata for that image. Navigational arrows are on the left and right which will allow you to sequence through the photos in the gallery.
While we do provide some photographic materials (and welcome submission of images to increase our collection), most of what we provide are drawings as these often contain the best depiction of particular features key to identifying species.
Click on the 'x' in the upper right to close the Photo Gallery Viewer. You also have options in the top right to view the gallery full screen and to turn the bottom thumbnails off and on.
More: Fact Sheets - Descriptive Details
When available, a small text icon/symbol will take you to more information.
1) If you see the text icon next to a feature, this link will take you to a page in our Glossary to give you a definition of that feature.
2) If you see the text icon next to a family or species (entity side of the key), this link will take you to a descriptive 'fact sheet' page which lists the available data we used to identify that entity for all stages (egg through larva).